Footer for a picture or photo with ImageMagick
Snippets 20:09 / 05.07.2021 2 399
Recently in one of the chats a task on ImageMagick was discussed, which I found interesting, due to the fact that it was considered to be difficult and there were no ready similar solutions.
Briefly, the task was as follows: you need to write a script that will use ImageMagick to add a footer to a photo or image. And this footer should not overlap the original image, but be added at the bottom by the width of the processed image. The footer (black) should have a logo (static) and two labels (white) with the ability to choose any fonts for these labels.
I've never had any experience with ImageMagick for PHP before, as for my tasks I was satisfied with the capabilities of GD library. I wanted to solve this task, and with the ready solution I'm sharing in this publication.
Disclaimer!
This is not a finished project or library, but just a code example of how you can use ImageMagick to add a footer with a logo and caption to a picture or photo.
Repository with the code on GitHub: https://github.com/Icemont/Simple-Imagick-Footer
Checklist
We need to write code that can then be used in the library for image processing in the final project, and demonstrate how this code works. The main thing here is the idea itself how to solve the problem, not a ready-made library for the final project.
For uploading the images to be processed we will have a simple static HTML page which will be used to pass our image to our image handler script. The handler script will check the uploaded image against the allowed image types, process the image and output it directly to the browser.
Idea
After reading a little bit of the ImageMagick documentation for PHP on the official site, I had an idea how to solve this problem quickly and easily. Since we need a static logo and the background color is also static - black, we can pre-draw our header and logo in a graphic editor and save it in a size that is certainly larger than the potential size of the output image. It is important to use a lossless compression format for the header image - I chose PNG. Let's name the image "footer.png".
This is the footer I quickly drew (it's a preview, the original is in the repository):

Solution
This solution does not claim to be perfect, nor does it claim to be the ultimate truth, and merely demonstrates one of the possible solutions to this problem.
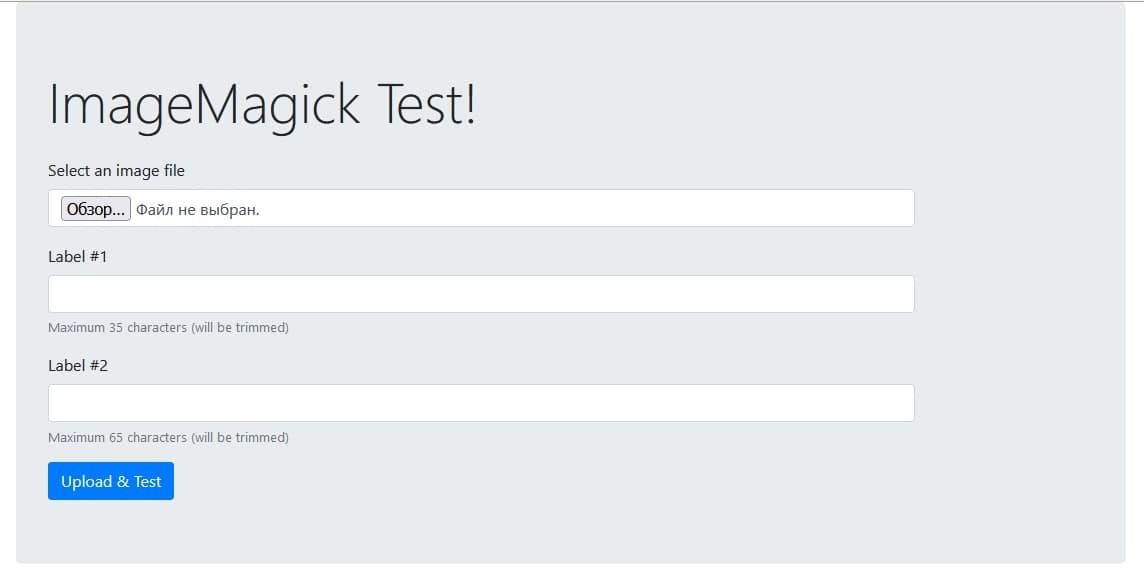
Create our static HTML page to send the processed photo or picture to the handler script.
In order to make our page look at least somewhat visually pleasing, we will use the CSS framework Bootstrap 4.
File: imagemagick.html
<!doctype html>
<html lang="en">
<head>
<title>ImageMagick Test</title>
<meta charset="utf-8">
<meta name="viewport" content="width=device-width, initial-scale=1, shrink-to-fit=no">
<link rel="stylesheet" href="https://cdn.jsdelivr.net/npm/[email protected]/dist/css/bootstrap.min.css">
</head>
<body>
<main role="main">
<div class="container">
<div class="jumbotron">
<h1 class="display-4 mb-4">ImageMagick Test!</h1>
<form method="post" action="imagemagick.php" enctype="multipart/form-data" id="loadform">
<div class="row">
<div class="col-auto col-lg-10">
<div class="form-group">
<label for="fileselect">Select an image file</label>
<input type="file" name="image" class="form-control" id="fileselect">
</div>
<div class="form-group">
<label for="text1">Label #1</label>
<input type="text" class="form-control" id="text1" name="text1" maxlength="35" aria-describedby="text1Help">
<small id="text1Help" class="form-text text-muted">Maximum 35 characters (will be trimmed)</small>
</div>
<div class="form-group">
<label for="text2">Label #2</label>
<input type="text" class="form-control" id="text2" name="text2" maxlength="65" aria-describedby="text2Help">
<small id="text2Help" class="form-text text-muted">Maximum 65 characters (will be trimmed)</small>
</div>
<button id="but_upload" type="submit" class="btn btn-primary">Upload & Test</button>
</div>
</div>
</form>
</div>
</div>
</main>
</body>
</html>
This is what our image loading page looks like in the browser:
We will also need fonts for the labels. For the example I took the free fonts Droid Sans and Droid Serif Italic. They are also present in the project repository on GitHub. For fonts, create a folder "fonts" and put the fonts in it.
Code of the handling script:
<?php

/**
 * Simple Imagick Footer
 *
 * @author   Ray Icemont <ray@icemont.dev>
 * @license  https://opensource.org/licenses/Apache-2.0
 */

setlocale(LC_ALL, 'ru_RU.utf-8');
mb_internal_encoding('utf-8');

define('MAIN_DIR', dirname(__FILE__));
$allowed_types = ['image/jpeg', 'image/png', 'image/gif'];

if (isset($_FILES['image']['tmp_name']) &&
    in_array(mime_content_type($_FILES['image']['tmp_name']), $allowed_types)) {
    if (!$string = filter_input(INPUT_POST, 'text1', FILTER_SANITIZE_SPECIAL_CHARS)) {
        $string = "Header with the name of the picture";
    }

    if (!$string2 = filter_input(INPUT_POST, 'text2', FILTER_SANITIZE_SPECIAL_CHARS)) {
        $string2 = "Signed by Lorem Ipsum";
    }

    $string = mb_substr($string, 0, 35);
    $string2 = mb_substr($string2, 0, 65);

    try {
        $im = new Imagick();
        $im->readImage($_FILES['image']['tmp_name']);

        $im_res = $im->getImageGeometry();

        $footer = new Imagick();
        $footer->readImage(MAIN_DIR . '/footer.png');

        $draw = new ImagickDraw();
        $draw->setTextEncoding('UTF-8');
        $draw->setFillColor(new ImagickPixel('white'));
        $draw->setFont(MAIN_DIR . '/fonts/droid-sans.ttf');
        $draw->setFontSize(120);
        $footer->annotateImage($draw, 20, 150, 0, $string);

        $draw->setFont(MAIN_DIR . '/fonts/droid-serif-italic.ttf');
        $draw->setFontSize(62);
        $footer->annotateImage($draw, 20, 250, 0, $string2);
        $footer->resizeImage($im_res['width'], null, imagick::FILTER_LANCZOS, 0.9);
        $im->addImage($footer);

        $im->resetIterator();
        $combined = $im->appendImages(true);

        header("Content-Type: image/jpg");
        echo $combined->getImageBlob();
    } catch (ImagickException $e) {
        exit('Imagick Error: ' . $e->getMessage());
    } catch (ImagickDrawException $e) {
        exit('Imagick Draw Error: ' . $e->getMessage());
    }
} else {
    exit('Error: Access denied! Select an image file!');
}
To test, let's take an image from any free image source and try to upload it for processing. I took a photo of our planet in space from NASA.
The result of processing the photo looks like this:
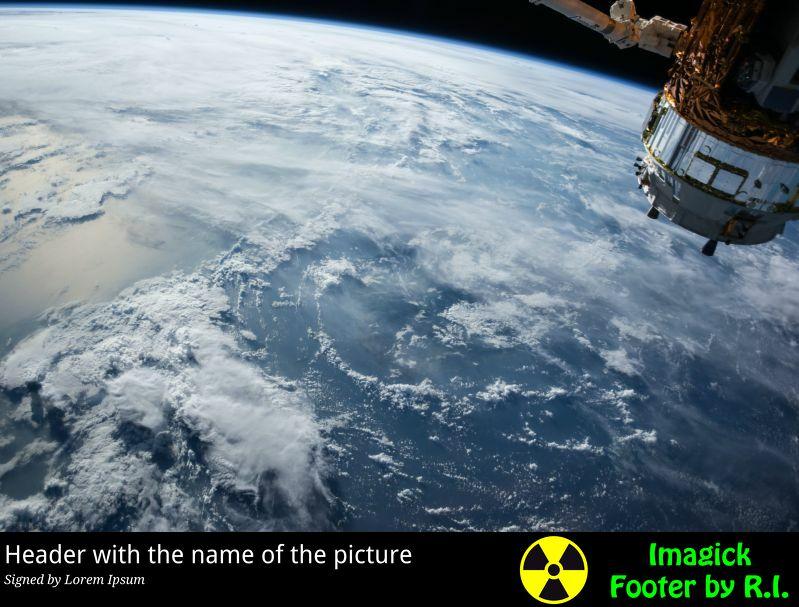
The result is fully consistent with the task at hand. Using the idea implemented in this code, we can easily create a library for convenient image processing in a similar way in our project.